
Avalanche Problem Web Series:
Part 2 – Persistent Slab
How to Apply the Avalanche Forecast to Your Riding
 For splitboarders venturing into the backcountry, information can be the difference between an epic day and tragedy. In an effort to increase education and avalanche awareness, Spark R&D is presenting a 7-part web series called Avalanche Problems, which will explain the nationally standardized types of slides most commonly described in advisories by avalanche forecasters.
Understanding the characteristics of each type will help to determine where avalanches are likely to occur and what kind of terrain should be avoided. In today’s installment, we will cover Persistent Slab Avalanches.
Persistent slabs in a nutshell
 When facets, depth hoar or surface hoar become buried, we are faced with an avalanche problem that can last for a long time and be widespread. The best strategy may be to seek out lower angle terrain until the layer has had time to heal. Be especially careful around trigger points, such as rocks, shallow spots and roll-overs. These slides are know for their ability to produce large avalanches.
What exactly is a persistent slab?
• A slab of cohesive snow (layer that is sticking together) that is sitting on top of a persistent weak layer.
• Examples of persistent weak layers include facets, depth hoar (developed facets) or surface hoar (frozen dew).
• These layers are all formed during periods of clear, calm and cold weather, and can be enhanced by shallow, early season snow, which is subsequently buried by following storms.
• Persistent slab conditions can produce large avalanches.
• Persistent weak layers are given this name for a reason: When these layers form and get buried, they tend to last for weeks, or even months.
• Warm weather and time may eventually compact persistent weak layer, making them stronger.
• Be careful though, because more loading (new snow or wind), or drastic warm ups, can reactivate these weak layers.
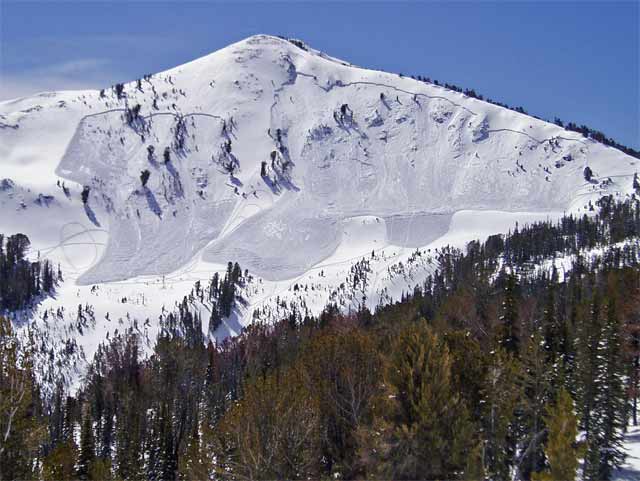
Where you might find a persistent slab, and how to avoid them
• Unfortunately, persistent weak layers can be widespread, meaning the layer exists on many slopes and elevations (although this depends on how exactly they were formed).
![]()
![]() • Assume the layer is everywhere unless the forecast mentions otherwise. Read your local advisory carefully for information on the distribution of this layer.
• Assume the layer is everywhere unless the forecast mentions otherwise. Read your local advisory carefully for information on the distribution of this layer.
• Areas of concern can include shallower snow, rocky slopes, or colder, protected slopes, like mid-elevation, shaded terrain.
• The only option is to seek out lower angle terrain (30 degrees or less) and be conservative.
• As the weak layer begins to heal and the forecast hazard starts to go down, gradually progress into terrain above 30 degrees. Pick slopes with clean runouts, no convexities or trigger points, and lower consequence. Pick safe zones wisely and make sure to use good travel technique.
• Remote triggers are possible with this layer, so be aware of what’s above and be careful of runouts (especially if cracking/collapsing is experienced).
How to look for and test persistent slabs
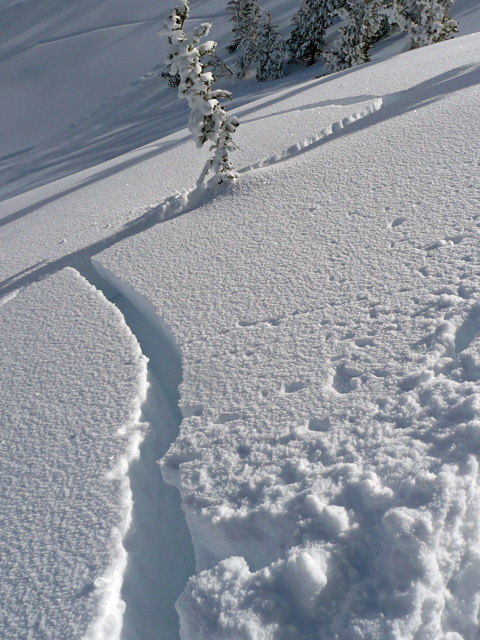
Photos courtesy of Sawtooth National Forest Avalanche Center (sawtoothavalanche.com).
• Relevant observations include watching for natural avalanches as well as cracking or collapsing while touring. This means the persistent weak layer is giving way under the weight of the slab and yourself, so just imagine if this happened on a steeper slope!
• By checking the forecast, you may have an idea of how deep the layer should be, so try digging several pits and observe where the layer exists. Facets often have a “sugary” or “granular” appearance, and do not pack into snowballs well.
• Performing snowpack tests, such as an Extended Column Test, can give us more information. It is important, however, to have the training and experience necessary to properly interpret the test results. (If you haven’t done so already, take an avalanche safety course!)
• Pushing your pole into the snow and feeling for a sudden decrease in resistance means you’ve punched through the slab into the weak layer. This can be a quick way of tracking the layer’s distribution throughout the day.
Tips: Don’t make any assumptions about persistent weak layers. They can be tricky to deal with, catch you off guard, and often produce large avalanches.
Disclaimer: Although characteristic, these descriptions are general, so make sure to read into any specifics mentioned on your local advisory. Also, this is just one piece of the puzzle, so remember to factor in the hazard rating and any field observations.
Find your local avalanche center: www.avalanche.org
Presented by Clark Corey
Splitboard Guide/Avalanche Educator