
Avalanche Problem Web Series:
Part 3 – Deep Slab
How to Apply the Avalanche Forecast to Your Riding
For splitboarders venturing into the backcountry, information can be the difference between an epic day and tragedy. In an effort to increase education and avalanche awareness, Spark R&D is presenting a 7-part web series called Avalanche Problems, which will explain the nationally standardized types of slides most commonly described in advisories by avalanche forecasters.
Understanding the characteristics of each type will help to determine where avalanches are likely to occur and what kind of terrain should be avoided. In today’s installment, we will cover Deep Slab Avalanches.
Deep slab avalanches in a nutshell
 When deep slab conditions exist, it’s time to ratchet back the terrain and play it safe. Once persistent weak layers are buried deep in the snowpack, it becomes hard to test and evaluate them, and the consequences can be dire as the slide is going to be large. Read into the advisory on where these conditions might exist. Until the layer has healed, either stick to lower angle terrain, or gravitate towards slopes where this structure isn’t present. Be cautious of runouts when the weak layer has been recently loaded.
What exactly is a deep persistent slab?
• A deep slab is essentially a persistent slab, but thicker (see previous post). The slab is going to be approaching 3 feet or more. Sometimes it can even involve the season’s entire snowpack. This strong slab is resting on a softer, persistent weak layer beneath.
• For review, persistent weak layers include facets, depth hoar and surface hoar. These weak layers form under cold and clear conditions, and when buried under a slab, become very problematic.
• Deep slab conditions are very tricky. Because of the slab thickness and nature of persistent weak layers, they can produce very large, and often times un-survivable avalanches.
• Given the fact this involves a persistent weak layer, deep slabs can stick around. These can be problematic for weeks to months.
• Like the persistent slabs, after periods of warm weather and little additional stress, they can slowly being to heal. After periods of being dormant, however, they can be reawakened if large loads are applied or drastic warm-ups occur.
Where you might find a deep slab, and how to avoid them
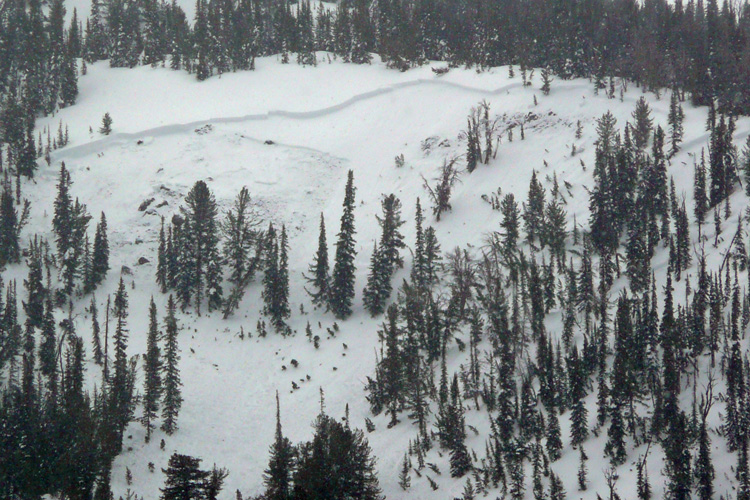
• Deep slab problems are as widespread as the persistent weak layer. This means the layer can exist on many slopes and elevations (although this depends on how exactly they were formed), or it could be localized.
![]()
![]() • Read your local advisory carefully for information on the distribution of this layer and think about where it existed before it got buried.
• Read your local advisory carefully for information on the distribution of this layer and think about where it existed before it got buried.
• When sensitive, very conservative decision-making is crucial. Stick to lower angle terrain (under 30 degrees) and be mindful of what’s above.
• Often times, before the layer fully heals, we enter a period of “low probability, high consequence”, meaning there’s a smaller chance you’d trigger it, but if you do, there’s a big price to pay.
• With this in mind, even when the layer is beginning to stabilize, try to avoid steep slopes with this structure. Your best bet is to read into the advisory to get an idea of where this layer exists (aspect and elevation) and avoid steep terrain in these areas.
• Stay away from rocky slopes or areas of shallower snow, as the weak layer is closer to the surface, and can be easier to trigger.
• Remote triggers are possible with this layer, so be aware of what’s above and be careful of runouts (especially if cracking/collapsing is experienced).
• Keep in mind that large avalanches mean safe zones must be selected carefully. These are the kind of slides that can run full path and are very destructive.
How to look and test a deep slab
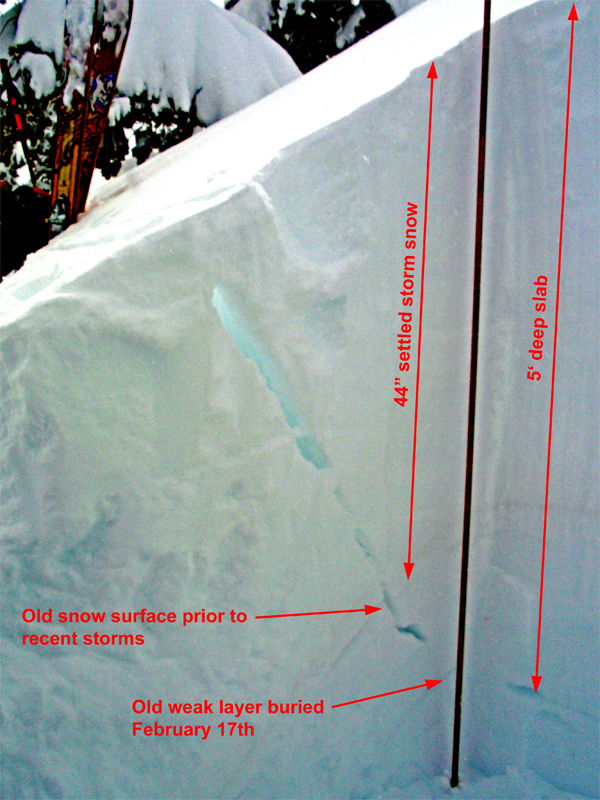
Example of deep slab pit analysis. Photos courtesy of Sawtooth National Forest Avalanche Center (sawtoothavalanche.com).
• Field observations become difficult, even for experienced professionals.
• Snowpack tests become less useful. When a layer is that deep, tapping on a shovel is not always going to produce results. Instead, you can focus on structure, so dig just to look for the layer and check for hardness.
• Signs of natural avalanches as well as cracking or collapsing while touring certainly are indicators, although these signs won’t always be present.
Tips: Deep slabs can often produce “false stable” snowpack test results (ECT or CT), meaning the lack of failure in your tests make the conditions look more favorable than they actually are. Instead, if the structure is present (slab over weak layer), one could assume it’s possible to trigger in the right spot. Until the weak layer actually becomes stronger and firmer, it should not be trusted.
Disclaimer: Although characteristic, these descriptions are general, so make sure to read into any specifics mentioned on your local advisory. Also, this is just one piece of the puzzle, so remember to factor in the hazard rating and any field observations.
Find your local avalanche center: www.avalanche.org
Presented by Clark Corey
Splitboard Guide/Avalanche Educator